Resolume Advanced Output — Screens, Slices & Output Transformation
Advanced Output (Output tab → Advanced) is where Resolume stops being a fullscreen app and becomes a stage tool: you define screens that route to physical displays, carve your composition into slices, and warp those slices onto real surfaces. It's the room where projection mapping happens — and the setup that Slice Transform builds on.
Prefer to watch? Here's the full 20-minute walkthrough — screens to polygon warping. Keep scrolling for the written version.
- Contrary to a popular myth, Avenue does have Advanced Output — screens, slices, and Input Selection all included.
- What's Arena-only is Output Transformation: the warping, edge blending, and projection-mapping tools in the second half of this guide. Full breakdown in our Arena vs Avenue guide.
Screens — the Unit That Reaches the Stage
Screens are the essential component that sends content out: no screens, no content on stage. Click the + icon → Screen to add one, then pick its physical display from the Device dropdown on the right side of the menu.
Two rules worth tattooing somewhere:
- If a display isn't in the dropdown, Resolume can't see it. That's an operating-system problem, not a Resolume problem — check your PC's display settings and make sure the display is active and set to extend.
- One display per screen. Assign a display to a second screen and it steals it from the first. But separate screens happily drive separate displays — that's exactly how you feed multiple projectors, a row of TVs, or an LED wall alongside a monitor.
Input Selection vs Output Transformation
Every slice lives in two places. Input Selection decides which pixels of your composition the slice captures. Output Transformation decides where those pixels land on the physical display. Shrink the input selection to a corner of your comp and the output shows just that corner; set it to 100% and the output gets the whole image. Master this split and the rest of Advanced Output is just tools on top of it.
The 4K quarter-screen gotcha
Classic mid-show panic: your content only fills a quarter of the LED wall. What happened: your composition outputs 1080p, the wall is 4K (3840×2160), and 1080p is exactly one quarter of 4K — so the slice parks in a corner with black space around it. The fix takes ten seconds: in Output Transformation, drag and stretch the slice over the full output. Both are 16:9, so the content scales cleanly with zero distortion.
The Transform-Mode Hotkey Toolkit
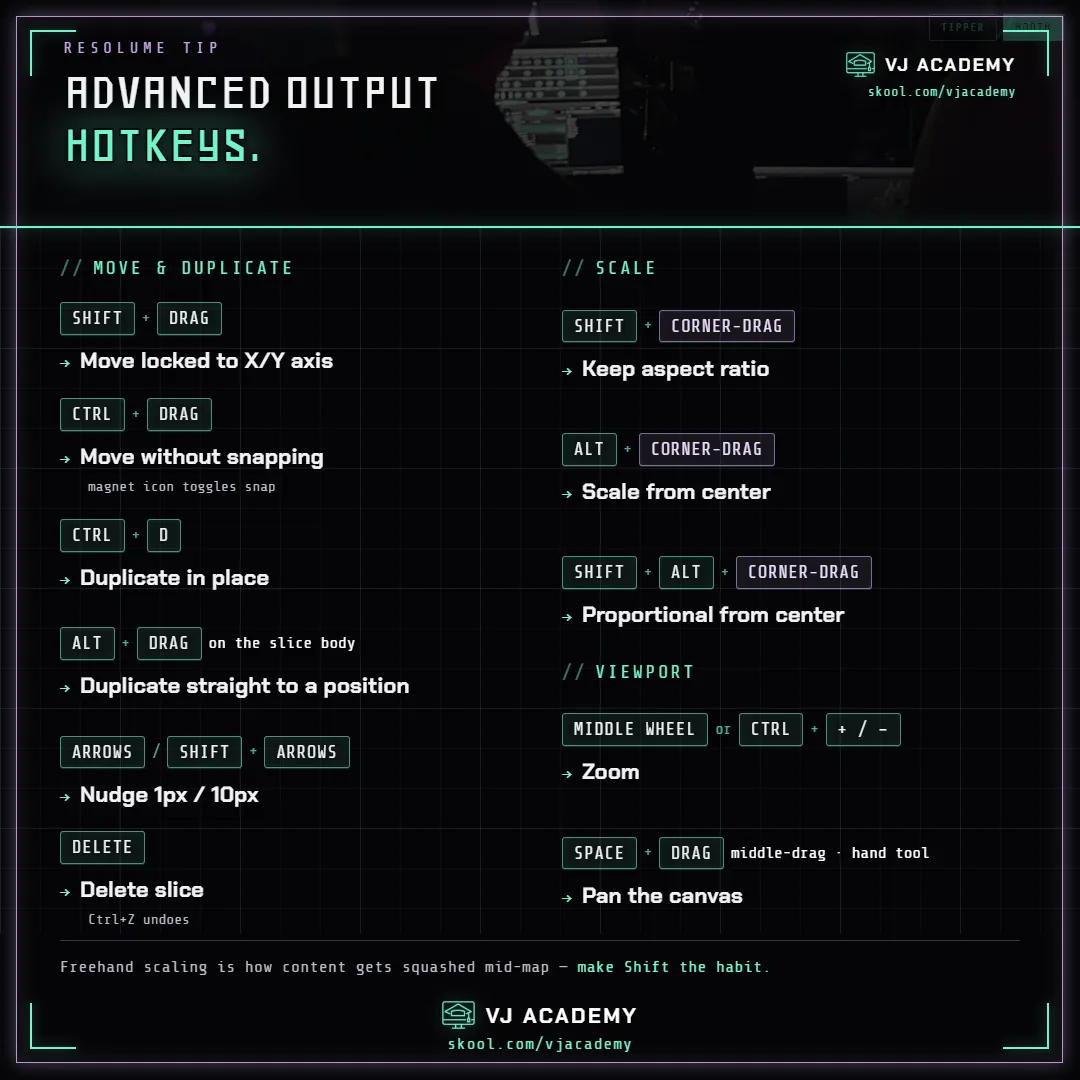
| Action | Hotkey |
|---|---|
| Move locked to X/Y axis | Shift + drag |
| Duplicate slice in place | Ctrl + D |
| Duplicate straight to a position | Alt + drag |
| Delete slice | Delete (or Ctrl+Z to undo a create) |
| Move without snapping | Ctrl + drag (magnet icon toggles snap) |
| Scale keeping aspect ratio | Shift + corner drag |
| Scale from center | Alt + drag |
| Scale proportionally from center | Shift + Alt + drag |
| Nudge 1px / 10px | Arrows / Shift + arrows |
| Zoom viewport | Middle mouse wheel or Ctrl +/− |
| Pan viewport | Space + drag, middle-mouse drag, or the hand tool |
The snapping magnet deserves a mention: with ten or more slices it's what keeps everything popping into place and aligned to center guides. Turn it off (or hold Ctrl) only when you need truly freehand placement. And the Shift-scale habit is worth building early — freehand scaling is the #1 way content gets accidentally squashed or stretched.
Edit Points Mode — Where Mapping Actually Happens
Transform mode moves whole slices; Edit Points mode gives you the individual corners and points, which is how you warp perspective and dial your output onto a real projector surface. One gotcha straight from the video: if the hand tool is still active, points won't grab — turn it off first.
- Linear vs Bezier: each slice's point mode. Linear is straight lines; Bezier adds curvature handles — the move for circular stage structures and curved surfaces.
- Draw polygons: + icon → Polygon, then left-click to place points and build any shape. Near an edge, points auto-snap to it (if you've used MadMapper, it'll feel familiar).
- Add / remove points: double-click along a path to add a point there; double-click an existing point to remove it. Zoom in and you can fine-tune a shape as precisely as you like.
- Move several points together: Shift+click to multi-select, then drag — the unselected points hold their position.
Output Masks, Grids & Visibility Toggles
- Output masks: draw one like a polygon, or grab a preset — heart, square, circle, triangle — and drag it over the content it should clip.
- Show Slice Grid: overlays a grid so you can actually see the warp while perspective-mapping.
- 8×8 LED grid: adds an 8-pixel grid — handy for LED walls, whose panel dimensions are usually multiples of 8.
- Identify Slices: hover-highlights which slice is which — a lifesaver once slices overlap or look identical.
- Show in Output: pushes the selected slice to the real screen, not just the editor preview.
The Right-Click Slice Menu
Right-clicking a slice is where the quality-of-life tools hide:
- Center X / Center Y, Mirror X / Mirror Y — instant symmetry for multi-slice layouts.
- Fill left / right / top / bottom half, or the whole area — plus Make Circle.
- Make Triangle — drew a sloppy three-pointer? One click perfects it.
- Match Input Shape / Match Output Shape — the most-used tool in the menu: copy a dialed-in shape from the input side to the output side (or back) as an exact replica. This is the bridge in the pixel-map workflow, and the same function our Slice Transform guide leans on after manual slice edits.
- Bring Forward / Send Backward — slice priority works exactly like layer stacking: whatever's above wins where slices overlap.
Cheat Sheet
- Open it: Output tab → Advanced
- No screens = nothing on stage; + icon → Screen, pick the display in Device
- Display missing? Fix it in the OS display settings first
- Input Selection = which pixels; Output Transformation = where they land
- Quarter of the 4K wall? Stretch the 1080p slice to the full output — same 16:9
- Shift = constrain, Alt = from center, Ctrl = no snap, Ctrl+D = duplicate
- Edit Points: double-click path adds, double-click point removes, Shift+click multi-selects
- Match Input/Output Shape = mirror a dialed shape across sides
- Avenue has all of this except Output Transformation (Arena-only)
What's Next
Advanced Output sits in the middle of the mapping ladder:
- Display Output — the lesson before this one: full-screen output, refresh rates, and display prep
- Slice Transform — the effect that routes clip content into the slices you just built
- Projection Mapping Guide — the big-picture walkthrough: gear, surfaces, and your first mapped project
- VJ Glossary — quick definitions for slice, output transformation, and the rest of the vocabulary
Frequently Asked Questions
Do I need Resolume Arena for Advanced Output, or does Avenue have it too?
Avenue DOES have the Advanced Output panel — screens, slices, and input selection included, so it can route different content to multiple displays. What Avenue lacks is Output Transformation: the warping, edge blending, and projection-mapping tools covered in the second half of this guide. Those are Arena-only.
Why is my content only filling a quarter of my 4K screen or LED wall?
Your composition is probably outputting 1080p onto a 3840×2160 display — 1080p is exactly one quarter of 4K, so the slice sits in a corner with black space around it. Fix: in Output Transformation, drag and stretch the slice to cover the full output. Both resolutions are 16:9, so your 1080p content scales up with no distortion.
Why isn't my display showing up in Resolume's device dropdown?
Resolume only lists displays your operating system has active. Head into your PC's display settings and make sure the display is detected and set to extend (not mirror). Once the OS sees it, it appears in the screen's Device dropdown in Advanced Output.
How do I add or remove points on a slice or polygon?
In Edit Points mode, double-click along the path between two points to add a new point there, and double-click an existing point to remove it. Shift+click selects multiple points so you can move them together. If points won't grab at all, check that the hand tool isn't still active.
What does Match Input Shape do in Resolume?
Right-click a slice → Match Input Shape copies the slice's input-side position and shape to the output side, giving you an exact replica — and Match Output Shape works the other direction. It's the fastest bridge between a dialed-in pixel map on the input side and the physical output.
Stuck on a mapping setup? Drop a comment on the YouTube video above, ask inside the Academy, or email vjacademy@outlook.com.