Projection Mapping for Beginners in Resolume
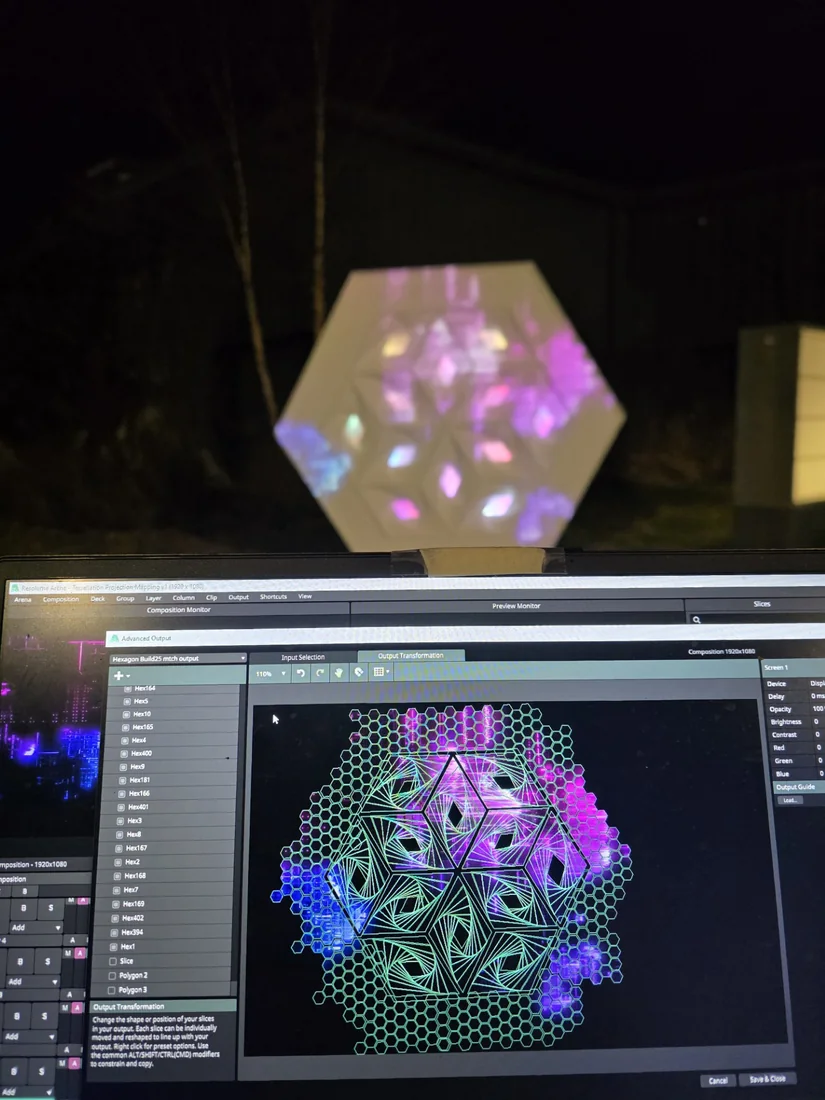
The intimidating-sounding part isn't actually hard. As Resolume itself puts it: projection mapping is basically digital tracing. You build a little virtual model of your physical setup inside Resolume — slices stand in for your surfaces — then you warp and mask those slices until the projected image lines up with the real object. Once it's set, any content you trigger flows through the mapping automatically. This guide walks you from "what is this" to your first mapped surface.
What Projection Mapping Actually Is
A normal screen plays your content full-frame. Projection mapping instead aligns video precisely to physical geometry — a building, a cube, a DJ booth, a sculpture — so the visuals wrap the real object instead of sitting in a rectangle. It's also called video mapping or spatial augmented reality.
The workflow always has three conceptual stages:
- Input Selection — carve your composition into slices, each grabbing a portion of your visuals.
- Output Transformation — warp and mask those slices so they land exactly on the physical surface.
- Content playback — whatever you trigger flows through the mapping automatically.
When you don't need it: if you're outputting to a single flat screen or LED wall, plain fullscreen output is fine — mapping only earns its keep when the surface has real shape to trace.
First Truth: You Need Arena, Not Avenue
Real mapping requires Resolume Arena. The whole warping engine — Output Transformation — is Arena-only, along with polygon slices, slice masks, perspective/Bezier warp, and edge blending. Avenue can push video to multiple flat screens, but it can't bend or map them.
Being honest about the cost: Arena is €799 vs Avenue's €299 (students and teachers get 50% off, bringing Arena to about €400). If you already own Avenue, the upgrade is €500 — you only pay the difference. For mapping there's no way around it, but the good news is you can learn the entire workflow before spending a cent — see the paper-cube trick below. (Full breakdown: Arena vs Avenue.)
The Gear: Projector Basics
Throw ratio — where the projector goes
Throw ratio tells you how far back to place the projector for a given image width. The formula: Throw Distance = Throw Ratio × Image Width. A 1.5:1 projector making a 3-meter-wide image sits 4.5 meters back.
| Type | Throw ratio | Use |
|---|---|---|
| Ultra-short | < 0.5 | Very close / rear projection |
| Short | 0.5–1.0 | Small / tight spaces |
| Standard | 1.5–2.5 | Most event work, medium rooms |
| Long | > 2.5 | Large venues, architectural mapping |
Project as straight-on as possible — extreme angles cost resolution and brightness (warping can fix the keystone shape, but not the lost quality). And secure the projector: any bump mid-show ruins your alignment and you can't re-warp during a set.
Lumens — bright enough to beat the room
Ambient light is the number-one enemy of projection: the image only reads if it's brighter than its surroundings. Match lumens to the environment:
| Environment | Minimum lumens |
|---|---|
| Dark indoor room (clubs, controlled venues) | 3,000–5,000 |
| Dim indoor event (some house lights) | 5,000–10,000 |
| Outdoor after sunset (facades, festival stages) | 10,000–20,000 |
| Outdoor with ambient light | 20,000+ (high-end laser) |
In a genuinely bright room, stop fighting physics — an LED wall beats projection every time. A common pro approach is hybrid: LED for the bright key content, projection for immersive ambiance in the darker zones.
The surface matters more than beginners expect
- Good: matte white or light-colored — painted drywall, foam core, MDF, rear-projection screen, white scrim fabric.
- Avoid: glossy/reflective (hotspots), transparent (light passes through), very dark (absorbs light), heavily textured (fights your detail).
The Resolume Workflow, Step by Step
Open Output > Advanced. The window has stages you work left to right. Here's the beginner path:
1. Input Selection — make your slices
Every new screen starts with one slice covering the whole composition. From the plus menu, add a slice, resize it to match your surface, and position it. Need several identical surfaces (cube faces, panels)? Alt+drag to duplicate, and let snapping line them up. Right-click to rename slices something you'll recognize at the venue ("DJ_Booth_Left") — future you will be grateful.
For flat panels, walls, and cube faces, use rectangular slices. For freeform shapes, Arena's polygon slices let you click control points around the shape — but they only do linear warping, so start rectangular.
2. Output Transformation — warp it onto the surface
Switch to the Output Transformation stage, select your slices, right-click, and choose Match Input Shape to auto-position them. Then align to the real surface.
Turn on the alignment grid with Output > Show Test Card and nudge one corner at a time until the diagonal grid lines match your surface. Use masking (double-click the outline to add points) to hide any spill outside the object. When it's dialed, save the whole setup as an .xml preset from the dropdown in the top-left — so you never rebuild it.
Your First Project (Start Stupidly Simple)
Resolume's own advice: simple geometry first — flat surfaces, boxes, cubes — then work up to curves. Don't start on a cathedral.
- A flat wall with one projector needs no warping at all — perfect for practicing slices and masks.
- A stack of cubes is a classic first 3D target. The math is friendly: a 1080-tall output split across 3 cubes vertically is 1080 ÷ 3 = 360, so each cube face is 360×360 in a 1080×1080 clip and lines up perfectly.
Going Bigger: Multi-Projector Edge Blending
Eventually one projector isn't enough and you overlap two into one seamless image — that's edge blending (Arena only, and squarely an intermediate move, so file it for later). The beginner-level shape of it: overlap the projectors physically by 15–25% (20% is a good default), create matching overlapping slices, align with the test card, perspective-warp each with only the four big corners, then enable Soft Edge on both and tune the fade.
The rule that trips everyone up: edge blending and complex warping (Bezier, heavy meshes, polygon slices) don't work together on the same slice — they break each other. Keep blended slices to simple perspective warps.
Common Beginner Mistakes
- Grabbing the wrong warp points — use the four big corners for keystone, not the small interior ones.
- Fighting ambient light — schedule outdoor projection after sunset, dim house lights, keep stage wash off the projection surface.
- An unsecured projector — one bump and your whole map is off. Truss-mount or lock it down.
- Mirrored displays — Resolume can't output to a mirrored/cloned display; set your desktop to extended mode. (DisplayLink docks don't work either — connect to the GPU directly.)
- Mask dragged off the slice — the output goes empty, because the mask clips to the slice boundary.
And the lifesaver hotkey: Ctrl+Shift+D (Cmd+Shift+D on Mac) instantly disables all outputs — use it if you accidentally send output to your main monitor and lose your interface.
Numbers and workflow verified against the VJ Academy knowledge base, July 2026. Projector specs vary by model — confirm throw and lumens for your exact unit.
Frequently Asked Questions
Can I do projection mapping in Resolume Avenue, or do I need Arena?
You need Arena. The warping engine — called Output Transformation — plus polygon slices, slice masks, edge blending, and perspective/Bezier warp are all Arena-only. Avenue can send video to multiple flat screens, but it can't warp or map them to a real surface. If mapping is your goal, Arena is the tool.
Where do I actually start in Resolume?
Open Output > Advanced. Work left to right: Input Selection (create slices that grab parts of your composition), then Output Transformation (warp and mask those slices onto the real surface using the four big corner points and the test card via Output > Show Test Card). Trigger content and it flows through the mapping automatically. Save your setup as an .xml preset from the dropdown in the top-left.
How bright a projector do I need?
It depends entirely on ambient light — the #1 enemy of projection. Roughly: 3,000–5,000 lumens for a dark indoor room, 5,000–10,000 for a dim event with some house lights, 10,000–20,000 outdoors after sunset, and 20,000+ (high-end laser) for outdoor with ambient light. In a genuinely bright room, an LED wall will always beat projection.
What's the difference between a rectangular slice and a polygon slice?
Rectangular slices support all three warp types — perspective, linear, and Bezier — so use them for flat panels, walls, and cube faces. Polygon slices (Arena only) let you trace freeform shapes but support linear warping only: no perspective, no Bezier, and no self-intersecting shapes (a red outline means it's invalid). Beginners should start with rectangular slices on simple surfaces.
Can I practice projection mapping at home without a venue or a big projector?
Yes — the paper mockup technique. Model a shape, export it as an .obj, unfold it in PePaKuRa Designer, then print, cut, fold, and glue a paper model. Aim a small projector — or even a flashlight — at it and map slices in Resolume. Paper is free, so you can iterate cheaply and learn the entire workflow at your desk.
My slice is red or nothing shows on the surface — what's wrong?
A red polygon outline means the shape crosses itself and can't render — redraw it without crossing edges. Empty output usually means a mask got dragged completely off its slice (masks clip to the slice boundary) or the wrong screen isn't enabled. Confirm your OS sees the display, the right screen is selected in Advanced Output, and its Enable toggle is on. Displays must be extended, not mirrored.
Map Your First Surface With Guidance
Projection mapping clicks fast once someone shows you the four-corner trick and sits with you through your first misaligned slice. Inside VJ Academy: hands-on mapping walkthroughs, the Advanced Output demystified, and 600+ working VJs — plenty of them mapping real installations — to ask when your surface won't line up. Wondering whether a dedicated tool fits better? See our honest Resolume vs MadMapper comparison.
Sourced from the VJ Academy knowledge base, July 2026. Stuck on a map? Email vjacademy@outlook.com.